
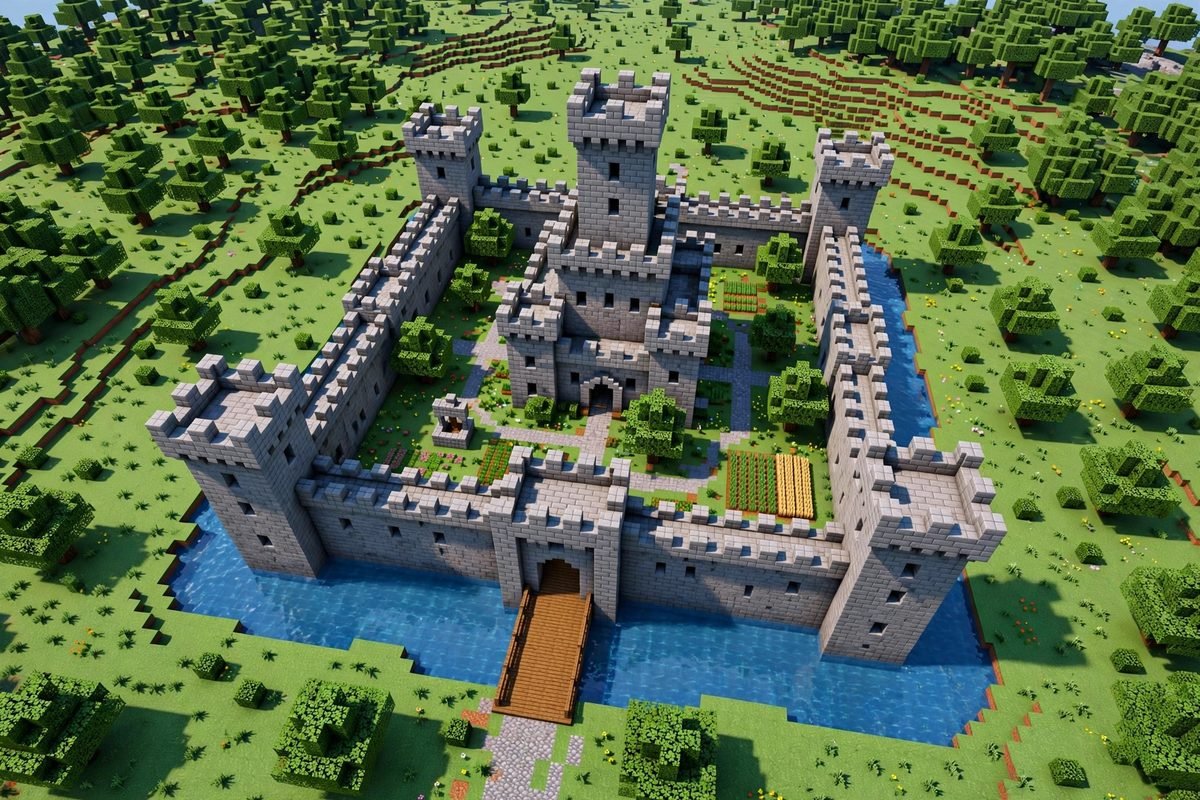
An easy minecraft castle layout is the difference between a weekend project you finish and an ambitious ruin you abandon. Castles look intimidating, but every castle — from a dirt starter fort to a stone mega-build — is just four parts arranged sensibly: walls, towers, a keep, and a gate. This guide gives you a simple, forgiving blueprint, a full materials list, a step-by-step build order, and layout variations for survival and creative players alike.
The Four Parts of Every Castle
Before placing a single block, understand the anatomy. Every minecraft castle layouts guide, simple or complex, works with these four components:
- Walls (the curtain wall): The perimeter. Tall, thick, and enclosing your courtyard. In an easy layout, walls are simple straight runs — no curves, no angles.
- Towers: Square towers at the corners (and flanking the gate). They give height, defense, and the classic castle silhouette.
- The keep: The big central building — your living quarters, storage, and throne room. It is the last thing you build and the first thing visitors notice.
- The gate: The entrance. One gap in the wall with a door, flanked by two towers, optionally with a drawbridge over a moat.
An easy layout keeps each part rectangular and separates them clearly. Fancy castles blur these parts together; beginner castles keep them distinct — and honestly, distinct reads just as “castle” from a distance.
The Simple Blueprint: A 31×31 Castle
Here is a complete easy minecraft castle layout you can build in survival over a weekend. The footprint is 31×31 blocks — big enough to feel grand, small enough to finish.
Step 1: Mark the perimeter
Lay out a 31×31 square on flat ground (or flatten one). Mark the four corners. This is your curtain wall line — everything goes inside it.
Step 2: Build the four corner towers
At each corner, build a 5×5 tower, 12 blocks tall, with a 1-block crenellated rim (alternating blocks and gaps) on top. Towers first, because they are your landmarks — once the towers stand, the castle already looks like a castle, which keeps motivation up.
Step 3: Connect with walls
Run walls between the towers along the square’s edges: 2 blocks thick, 8 blocks tall, with a wall-walk (a 1-block-wide walkway on top, protected by a crenellated outer rim). Leave a 3-wide gap in the middle of one wall — that is your gate.
Step 4: Build the gatehouse
Flank the gate gap with two 5×5 towers (10 blocks tall), and span the gap with an arch or a simple lintel of stairs. Add a wooden door or fence gate. Optional but wonderful: dig a 3-wide, 2-deep moat in front and lay a wooden-plank drawbridge across it.
Step 5: Raise the keep
In the center of the courtyard, build the keep: a 9×9 tower, 14 blocks tall, with floors every 4 blocks (ground floor: storage and crafting; middle: living quarters; top: throne room or lookout). Give it a crenellated roof and a few window slits (glass panes set into the walls).
Step 6: Detail the courtyard
Fill the space between keep and walls with purpose: a stable (fence posts and hay bales), a farm plot, a well (a 3×3 water hole with a little roof), and paths of gravel or stone slabs connecting gate to keep. Details are what turn a stone box into a place.
Materials List
For the 31×31 layout above, in survival, gather roughly:
- Stone bricks or cobblestone: 2,500–3,500 blocks (walls, towers, keep). Mix cobblestone with stone bricks for texture — pure cobblestone looks flat.
- Wood planks: 300–500 (floors, drawbridge, doors, details).
- Stairs and slabs: 200–300 stone stairs/slabs (roofs, crenellations, wall-walk edges).
- Glass panes: 64–128 (windows).
- Fences: 100–150 (railings, stable, wall-walk safety).
- Torches or lanterns: 100+ (lighting — a dark castle spawns mobs inside).
- Optional: banners for heraldry, trapdoors for shutters, leaves for courtyard greenery.
Pro tip: build a small cobblestone generator or strip-mine session before starting. Running out of stone at 80% completion is the classic castle-killer.
Build Order That Actually Works
Order matters. This sequence keeps the project motivating and functional at every stage:
- Flatten and mark. One session. Boring but essential.
- Towers. Four corner towers — the castle becomes visible, motivation spikes.
- Walls. Connect the towers. You now have a defensible perimeter — you can live here.
- Gate and moat. The entrance makes it feel real.
- Keep shell. Walls and floors, no interior yet. Weatherproof base achieved.
- Lighting. Torch every dark corner before decorating — mobs spawning inside your castle is demoralizing.
- Interiors and courtyard. The fun part: furniture, farms, banners, details.
- Crenellations and trim. The finishing pass that makes it look finished.
Layout Variations
The 31×31 is a starting point. Adapt it:
The tiny starter fort (15×15)
Four 3×3 corner towers, single-thick 6-high walls, no keep — just a small house inside. Buildable in a day. Perfect for a first survival base with castle flavor.
The hilltop castle
Build on a hill or mountain and let the terrain be your outer defense: walls only on the accessible sides, towers on the high points. Half the wall-building, twice the drama.
The waterfront castle
Put water on two sides (a river or lake edge) and a moat on the others. Water is free defense — most hostile mobs cannot cross it effectively — and the reflection looks magnificent.
The walled town
Scale the perimeter to 61×61 and put a village inside instead of just a keep: houses, a market square, a church tower. The castle becomes the centerpiece of a settlement — the most impressive variant, and a genuine long-term project.
Common Castle-Building Mistakes
- Starting too big. A 101×101 mega-castle as a first project ends as a foundation outline. Start 31×31; expand later.
- Forgetting lighting. Dark wall-walks and courtyards spawn creepers inside your defenses. Light as you go.
- Flat single-material walls. Pure cobblestone walls look like a parking garage. Mix stone bricks, add pillar strips every 5 blocks, vary the top edge.
- No interior plan. A beautiful empty keep is a warehouse. Decide each floor’s purpose before building it.
- Building the keep first. It is the most satisfying part and the worst starting point — without walls, it is just a tower in a field.
- Ignoring the approach. The view arriving at your castle matters most. Put your effort into the gate side.
Defending Your Castle (Survival Mode)
A castle that cannot defend itself is a decoration. The easy defenses that actually work:
- Lighting: The single most effective defense. No spawns, no siege.
- The moat: 3 wide, 2 deep, optionally with lava at the bottom for hard mode. Mobs fall in and cannot climb out.
- Wall-walk access: Ladders or stairs to the wall tops let you fight from above — height advantage is real in Minecraft combat.
- Iron golems: Two or three patrolling the courtyard handle anything that gets inside.
- The gate: An iron door with a button (not a pressure plate — mobs trigger those) keeps everything out.
Making Your Castle Feel Alive
The difference between a good easy minecraft castle layout and a great one is inhabitation. Empty castles feel like museums; lived-in castles feel like places. A few cheap tricks: armor stands with spare armor in the barracks, item frames with tools in the workshop, a lectern with a written book (a “royal decree”) in the throne room, banners in your chosen colors on every tower, and villagers — even just two or three with job blocks — wandering the courtyard. Villagers are the single cheapest way to make a build feel alive, and they give your castle a function beyond looks.
Sound and light do the rest. Note blocks wired to a doorbell at the gate, lanterns (not just torches) for warmer light, and a consistent banner pattern repeated across towers create identity. The best castle builders think like set designers: every room should suggest someone was just here. A half-eaten meal (cake) on the throne room table, a brewing stand still bubbling in the alchemist’s corner, a map wall tracking your explorations — these details cost almost nothing and deliver most of the magic.
Easy Minecraft Castle Layout FAQ
What is the easiest castle layout in Minecraft?
A square perimeter with four corner towers, one gate, and a central keep — the 31×31 blueprint in this guide. Rectangles and squares are dramatically easier than curves or angles.
How many blocks do I need for a small castle?
A 31×31 castle needs roughly 3,000 stone-type blocks plus wood, stairs, and glass. A tiny 15×15 starter fort needs under 1,000.
What is the best material for a castle?
Stone bricks mixed with cobblestone — cheap, blast-resistant, and good-looking with minimal effort. Deepslate variants work for a darker style.
How do you make castle walls look good?
Mix two materials, add vertical pillar strips every 4–5 blocks, vary the wall top with crenellations, and never leave a long flat run unbroken.
Should I build a moat?
Yes if you are in survival — a 3-wide, 2-deep moat is the cheapest effective defense in the game. In creative, it is optional but looks great.
What goes inside the castle courtyard?
A keep (living/storage), a stable, a farm plot, a well, and paths connecting them. Every courtyard needs a purpose or it feels empty.
Conclusion
An easy minecraft castle layout is just four parts in a sensible arrangement: walls, towers, keep, gate. Start with the 31×31 blueprint, build in the order that keeps you motivated, light everything, and detail the courtyard. Finish that, and the mega-castle will not seem so impossible anymore.
For building techniques and block mechanics, browse Minecraft Wiki’s tutorials hub. And before you start smelting all that cobblestone, make sure your crafting tables are set up — you will be using them a lot.